finPOWER Connect -
Setup a Shared Folder & Dropbox for Document Manager

This blog post, is a guide to the process of setting up a designated folder on a networked computer drive to function as the root folder for Document Manager in both finPOWER Connect Desktop and finPOWER Connect Cloud. This process requires the Document Manager Add-On.
To set up a Shared Folder using One Drive please see our blog: finPOWER Connect - Setup a Shared Folder & OneDrive for Document Manager
The finPOWER Connect Document Manager Add On allows documents and files to be stored against Clients, Accounts etc. This might include documents such as a scanned image of a Drivers Licence or a signed Loan Contract.
Utilising Dropbox to store Documents in the cloud, affords the ability to synchronize a network folder to Dropbox and use it as the main Document Manager folder. Effectively using Dropbox as a Document Manager within the finPOWER Connect platform.
This functionality allows users to conveniently upload files via finPOWER Connect or via the web using the Dropbox website. Files uploaded via the Dropbox website will be synchronized with all designated devices linked to your Dropbox account, ensuring real-time updates. These files will subsequently be accessible within finPOWER Connect, enabling users to easily add files by coping them using Windows File Manager.
Set-up Instructions
If the Document Manager folder is already on a shared drive, parts of this blog can be skipped, however the steps below which are covered in this blog will still need to completed:
- Configure Dropbox on the computer that hosts your Document Manager files.
- Move your existing Document Manager folder from its current location to a folder within the Dropbox folder.
- Change the configuration of your finPOWER Connect Desktop and finPOWER Connect Cloud systems.
These Set-up Instructions assume that a Dropbox has been set up. To sign up for a free Dropbox account (5GB storage) go to the DropBox website. If Dropbox is not used, consider alternatives such as OneDrive for Business, (included in an Office 365 subscription), for sharing Document Manager files.
Backup Document Manager
Before proceeding with any changes, it is crucial to ensure that you have a comprehensive backup of your current Document Manager files. This extra step will help safeguard your important documents and data against any potential loss or errors that may occur during the process.
Select a File Server
A computer is required to host the Document Manager files. This can be any system within a network, provided it has adequate disk space and CPU capacity. We will refer to this computer as the "File Server." To discover the name of a Windows computer, open the Settings application and select the System tab. The computer's name will be displayed in bold text in the top-left corner of the information pane.
Create a Shared DocMan Folder
- Navigate to the "File Server" computer.
- If the Dropbox desktop app isn't installed, download it here: Download & Install - Dropbox
- NB: The Dropbox installer creates its own root (\Dropbox) folder.
- However, if you want the Dropbox folder to be "D:\Dropbox", select the D: drive when prompted to choose where you want the folder to be created.
- Create a Document Manager folder inside the Dropbox folder. E.g., D:\DropBox\DocMan.
Share the Folder & Assign Permissions
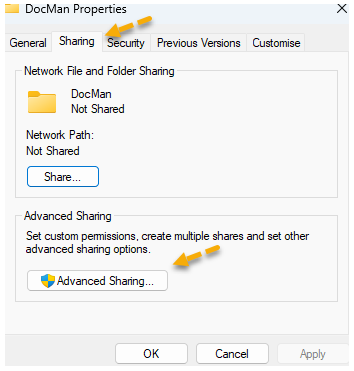
- Right-click DocMan Folder
- Select Properties > Sharing tab
- Click the Advanced Sharing button
- A Windows User Account Control message may appear:
- Click Yes to "Allow this app to make changes to your device"
- Click the Share this folder checkbox
- Ensure that the Share name is "DocMan"
- Click OK (to return to the DocMan Properties page)
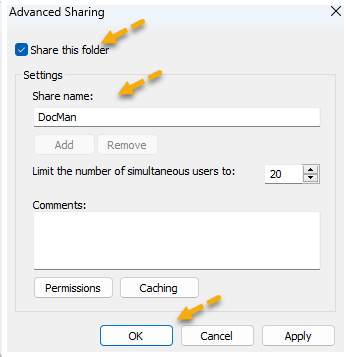
- Click the Share button
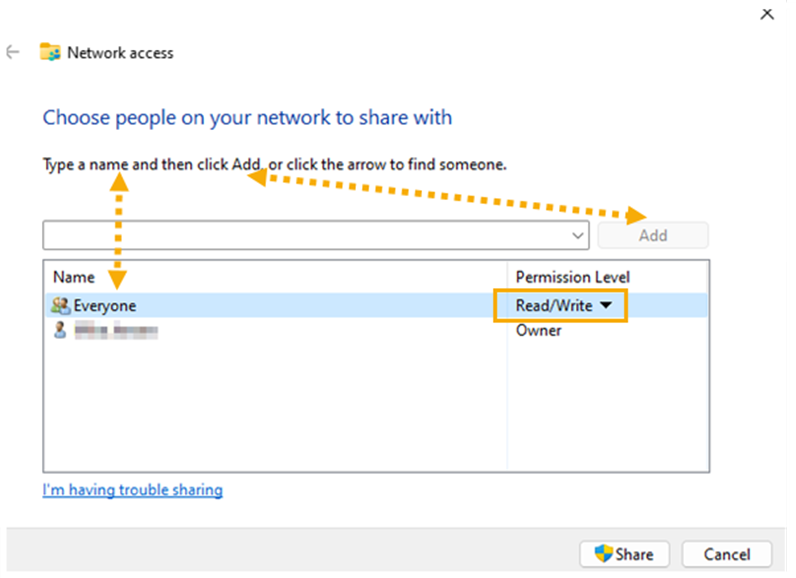
- Type Everyone in the text box
- Click Add (you will see everyone appear in the list)
- Click the Drop-down list in the Permission Level column of the Everyone row
- Select Read/Write
- Click Share (you may see another Windows Account Control message)
- Click Yes (to see a confirmation box with the message "Your folder is shared"
- Click Done > Close
Check if the Shared Folder has been Shared
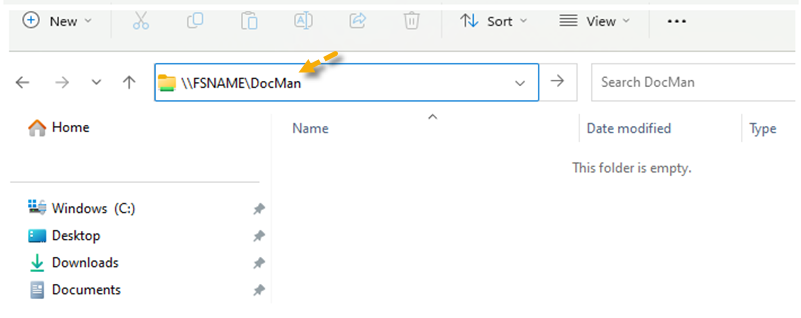
- Open Windows File Explorer on a different PC on the network.
- In the address bar, type \\FSNAME\DocMan, where "FSNAME" is the name of your File Server.
- Press ENTER
- File Explorer will open to an empty Folder
- Leave the Folder Open
Preload the new DocMan Folder
If currently utilizing Document Manager, transfer all the contents from the existing Document Manager folder to the shared folder accessed in
Windows File Explorer in the previous step.
NB:
Ensure Document Manager Files are backed up prior to proceeding with this step.
Check Document Manager Synced to the Cloud
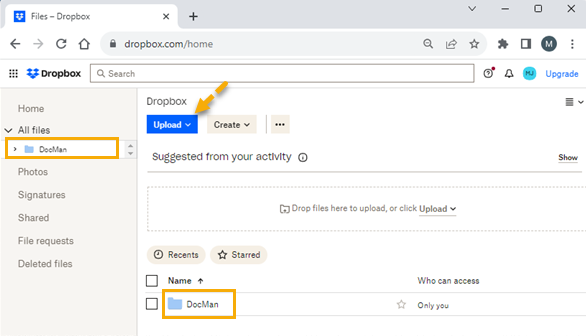
- Open your browser and navigate to the Files page on Dropbox's website.
- Check that the files copied to the shared DocMan folder are present in your Cloud drive. (It may take a short time for the files to upload from the File Server to the Dropbox server)
- Add files to your Document Manager using this Dropbox page
- Click the Upload button to start an upload (Ensure to select the correct folder for the Client or Application you are working with before you upload)
- NB:
Although
Dropbox
allows you to delete files, exercise caution, as they may be needed for Service Logs, Identification Items, and other objects. We strongly recommend using
finPOWER Connect to delete files, as it will perform all necessary checks to ensure the files can be safely deleted.
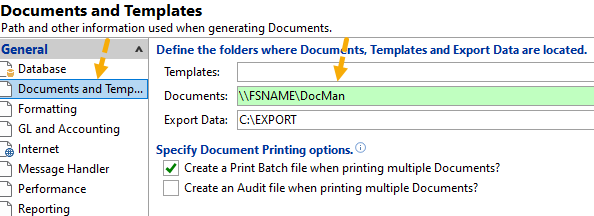
Configure finPOWER Connect Desktop to use the shared DocMan folder
- In finPOWER Connect select Global Settings > Document and Templates
- Set the Documents path to the UNC path for the DocMan folder in Dropbox on the File Server. e.g. \\FSNAME\DocMan, where "FSNAME" is the name of your File Server.
- Save > Exit Global Settings
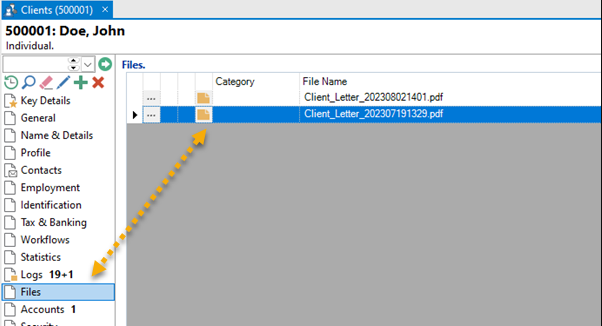
Verify visibility of files in the Document Manager folder
- Open a Client that has files in the Files tab - check that the content matches what was in the local Document Manager folder previously.
- Publish a Document for the Client.- check that the Document that was published now appears in the Files tab.
- Return to the Dropbox web page - check that the newly created Document file appears after a minute or two. You will need to navigate to the correct subfolder for the Client you were working with.
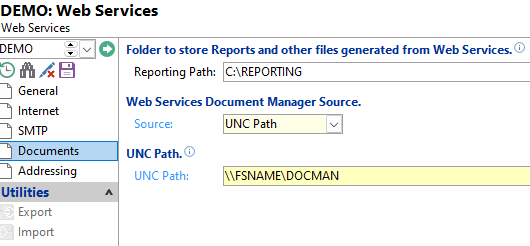
Configure finPOWER Connect Web Services to use the shared DocMan folder
- In finPOWER Connect, go to the Tools > Web > Web Configurations page.
- Select the Web Configuration you use in Web Services.
- Go to the Documents tab - change the UNC Path to be the path to your Dropbox Document Manager folder. e.g. \\FSNAME\DocMan, where "FSNAME" is the name of your File Server.
- NB: To check the name of the Web Configuration being used by Web Services, go to Web Services > Web Admin in your browser, and click the Configuration tab. Under "Other", look for the Web Config item.
- Save changes made.
Configure IIS to access the shared Docman folder
- The shared folder must be accessible to the IIS Application Pool that runs Web Services. That may mean that IIS must run in the context of a Windows user that has permission to access the folder.
- NB:
For more information and detailed instructions, refer to the
finPOWER Connect Web Services Installation and Configuration document,finPOWER Connect Web Configurations, Document Manager section.
Check finPOWER Connect Cloud & Web Services can access the new Document Manager folder
- Open the Client that you published the Document for previously.
- Go to the Files tab - check that the Document is in the Files tab.
- Check you can open the Document from within finPOWER Connect Cloud.
Source: Author - Michael Jensen of Intersoft Systems Limited "Using a Shared Folder and Dropbox for Document Manager" (Blog), 18 September 2023
Need mbsl to arrange a demonstration and/or assistance to setup a Shared Folder and Dropbox for Document Manger?